 Caffe is one the most popular deep learning packages out there. In one of the previous blog posts, we talked about how to install Caffe. In this blog post, we will discuss how to get started with Caffe and use its various features. We will then build a convolutional neural network (CNN) that can be used for image classification. Caffe plays very well with the GPU during the training process, hence we can achieve a lot of speed-up. For the purpose of this discussion, it is assumed that you have already installed Caffe on your machine. Let’s go ahead and see how to interact with Caffe, shall we?
Prerequisites
Create a python file and add the following lines:
import sys
import numpy as np
import matplotlib.pyplot as plt

sys.insert('/path/to/caffe/python')
import caffe
If you have a GPU onboard, then we need to tell Caffe that we want it to use the GPU:
caffe.set_device(0)
caffe.set_mode_gpu()
We are now ready to build a network.
Building a simple layer
As the name suggests, convolutional neural networks (CNNs) rely heavily on convolutions. Big surprise, right? CNNs are still basically neural networks, which means they consist of multiple layers joined together. There are many different types of layers that can be used to build a CNN, convolution layer being one of them. Let’s go ahead and see how we can define a simple convolution layer in Caffe. Create a file called “myconvnet.prototxt” and add the following lines to it:
name: "myconvolution"
input: "data"
input_dim: 1
input_dim: 1
input_dim: 256
input_dim: 256
layer {
  name: "conv"
  type: "Convolution"
  bottom: "data"
  top: "conv"
  convolution_param {
    num_output: 10
    kernel_size: 3
    stride: 1
    weight_filler {
      type: "gaussian"
      std: 0.01
    }
    bias_filler {
      type: "constant"
      value: 0
    }
  }
}
We just defined a single layer CNN consisting of 10 convolutional neurons (as specified by “num_output”) with a kernel size of 3×3 (as specified by “kernel_size”) and a stride of 1 (as specified by “stride”).
Visualizing the network
Before we understand how to use the above network, let’s see what it actually looks like! The good thing about Caffe is that it provides a way to visualize our network with a simple command. Before that, we need to install pydot and graphviz. Run the following on your terminal:
$ pip install pydot
$ sudo apt-get install graphviz libgraphviz-dev
$ pip install pygraphviz
We are now ready to visualize the network. Run the following command on your terminal:
$ python /path/to/caffe/python/draw_net.py myconvnet.prototxt myconvnet.png
Now, if you open “myconvnet.png”, you will see something like this:
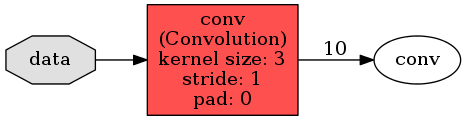
Pretty sweet, right? In the next blog post, we will discuss how to load this network and interact with it.
——————————————————————————————————————

It is useful. Thank you
Thanks! Glad you found it useful.
I am exploring everything in caffe to know how to apply in my problem. I don’t use caffe for image processing, my dataset only includes 42 features (fields) and 1 label with many classes, that means there are many difference in preparing/transfering data. Do you have document about that?. Thank you alot
Hi Prateek, Thanks for great post, If you have time can you write about Cudnn & tensorRT for inference as well.